If you’re using MailerLite for your email marketing efforts, you’re likely utilizing form embeds to capture leads on your landing pages. In this article, we’ll explore how to pass form submission events to Google Tag Manager’s dataLayer, and from there, track these events in Google Analytics 4 (GA4).
MailerLite provides three ways to embed your forms. While this guide will cover all three methods, we will focus primarily on one—the JavaScript Snippet.
The JavaScript Snippet
This method requires adding a snippet into the header of your page and placing a <div> element at the location where you want the form to appear. The JavaScript snippet facilitates the connection of the form to your server, while the <div> element, containing a form attribute, fetches and displays your form as shown below:
<div class="ml-embedded" data-form="xxxxxxx"></div>
Assuming you have already integrated Google Tag Manager (GTM) tracking code onto your page, the next step is to embed this snippet and then test to ensure GTM recognizes the form placement.
To do this, enable GTM’s preview mode and navigate to the page where you have embedded the form.
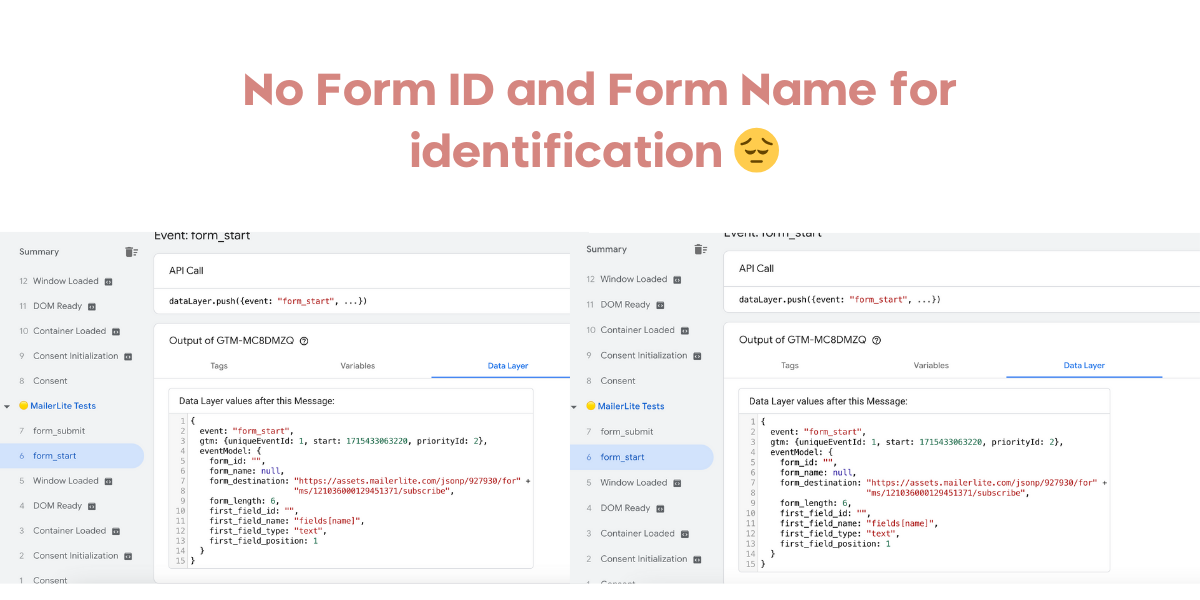
Here’s the good news: as you fill out the form, an event labeled form_start is passed to GTM. When you submit the form, a form_submit event is passed. This seamless integration between MailerLite and GTM means you do not require any custom configurations.
However, a minor issue arises—we do not see any form ID or form name to identify which form was submitted.
Regrettably, MailerLite does not provide a straightforward way to append such identifiers. We attempted to modify the <div> code as follows to include identifiers, but these efforts require further customization:
<div class="ml-embedded" id="form-id" name="form-name" data-form="xxxxxxx"></div>
And this
<div class="ml-embedded" data-id="form-id" data-name="form-name" data-form="xxxxxxx"></div>
And also this
<div class="ml-embedded" data-form-id="form-id" data-form-name="form-name" data-form="xxxxxxx"></div>
None of these methods work.
So we are left with 2 options:
Method I: Identify the form based on the page URL
Create a GTM variable (you could do a simple LookUp table to match page URLs with the form names) and update a GA4 event parameter based on this.
The drawback of this approach is its lack of scalability. Every time you update the form, a team member must modify the GTM variable in the Lookup Table. If overlooked, this can lead to inconsistent data, which is undesirable. While this method could be incorporated into the launch checklist as a routine process, it still introduces an undesirable dependency.
Therefore, we have a second method.
Certainly, almost always a better way to set up tracking is to ensure that your implemented method is scalable without additional dependencies or requiring excessive time. At TrackFunnels, we always strive to implement scalable tracking solutions that minimize dependencies and reduce the time required for setup.
Method II: A Scalable Method with slight Javascript hack
We employ a site-wide JavaScript that monitors whether the form has loaded on the page. Once the form is fully loaded, it automatically appends a form ID or form name of your choice, thus minimizing dependencies. This method involves adding an extra line right below the original <div> provided by MailerLite:.
//Original MailerLite embed code
<div class="ml-embedded" data-form="xxxxxxx"></div>

//A new line with your desired attributes added right below it
<div class="ml-form-attributes" append-form-name="my-form-name" append-form-id="my-form-id"></div>
Notice that we introduces an additional line with the attributes you wish to append to your form code. Naturally, your development team must remember to include this step. However, by establishing this as a standard process, there is no dependency on other teams, and the process ensures nothing is forgotten.
Here is the JavaScript that should be included in your page to detect form loading. It is recommended to place this script before the closing </body> tag:
// Select the target node
var targetNode = document.body;

// Options for the observer (which mutations to observe)
var config = {
childList: true,
subtree: true
};

// Callback function to execute when mutations are observed
var callback = function(mutationsList, observer) {
for (var mutation of mutationsList) {
if (mutation.type === 'childList') {
// Check if the form element has been added
if (document.querySelector('.ml-block-form')) {

// Fetch form ID and name from the additional div
var formAttributesDiv = document.querySelector('.ml-form-attributes');
var newFormId = formAttributesDiv.getAttribute('append-form-id');
var newFormName = formAttributesDiv.getAttribute('append-form-name');

// Update the form ID and name
var form = document.querySelector('.ml-block-form');
form.id = newFormId;
form.name = newFormName;

// Disconnect the observer since the changes are made
observer.disconnect();
}
}
}
};

// Create an observer instance linked to the callback function
var observer = new MutationObserver(callback);

// Start observing the target node for configured mutations
observer.observe(targetNode, config);
Check the red highlighted code parts: It is assumed that your form class will always be ml-block-form. Currently, this is the class MailerLite assigns to all forms.
Check the blue highlighted code parts: Notice that this directly corresponds to the attributes from the additional <div> we added.
If there are changes to these elements, you’ll need to update the observer script accordingly.
Once implemented, this setup provides a robust method to ensure that form identifiers are dynamically applied, facilitating accurate tracking in GA4. You have two options to verify this functionality in GA4, which we will explore next.
Monitoring Form Submit and Form Start Events in GA4
Once you’ve implemented the JavaScript and div attributes described earlier, you have two options for verifying this setup in GA4. Note that form start and form submit events are captured by Google Tag and seamlessly flow into your GA4 account, facilitated by enhanced measurement (provided it’s enabled). Adding a form_name to these events aids in the identification of the form. So, if your goal is to just get the default GA4 events processed with the form name, you’re done. Do you tests to verify the solution works for you.
If, however, you would like to have an event name to your liking when a form gets submitted, here is what you can do.
Create your own event names on MailerLite Form Submits
You can create a new GA4 event that can be fired from Google Tag Manager based on the form_start and form_submit events when the form ID or name matches a predefined string.
For instance, if you utilize multiple email platforms or multiple MailerLite accounts and each account has multiple forms embedded on your website, you might maintain a common form ID for forms for each account but assign distinct form names.
So lets say you have 2 accounts “mailer-lite-1” and “mailer-lite-2”. All forms under “mailer-lite-1” can be assigned form ID = mailer-lite-1 while all forms under mailer-lite-2 can be assigned the form ID = mailer-lite-2.
Utilize the extra line of code we added to the embed code for assigning these like so:
<div class="ml-form-attributes" append-form-name="my-form-name-1" append-form-id="mailer-lite-1"></div>
and
<div class="ml-form-attributes" append-form-name="my-form-name-1" append-form-id="mailer-lite-2"></div>
This allows for the creation of a GTM trigger when the form action matches a specific ID, subsequently passing a GA4 event name aligned with your objectives. Let’s do it with the example of the embed code I mentioned above. I’m using this for a contact form on my website
<div class="ml-embedded" data-form="qf5uoo"></div>
<div class="ml-form-attributes" append-form-name="contact-form" append-form-id="mailer-lite-form"></div>
Set Up in Google Tag Manager
- Creating Variables
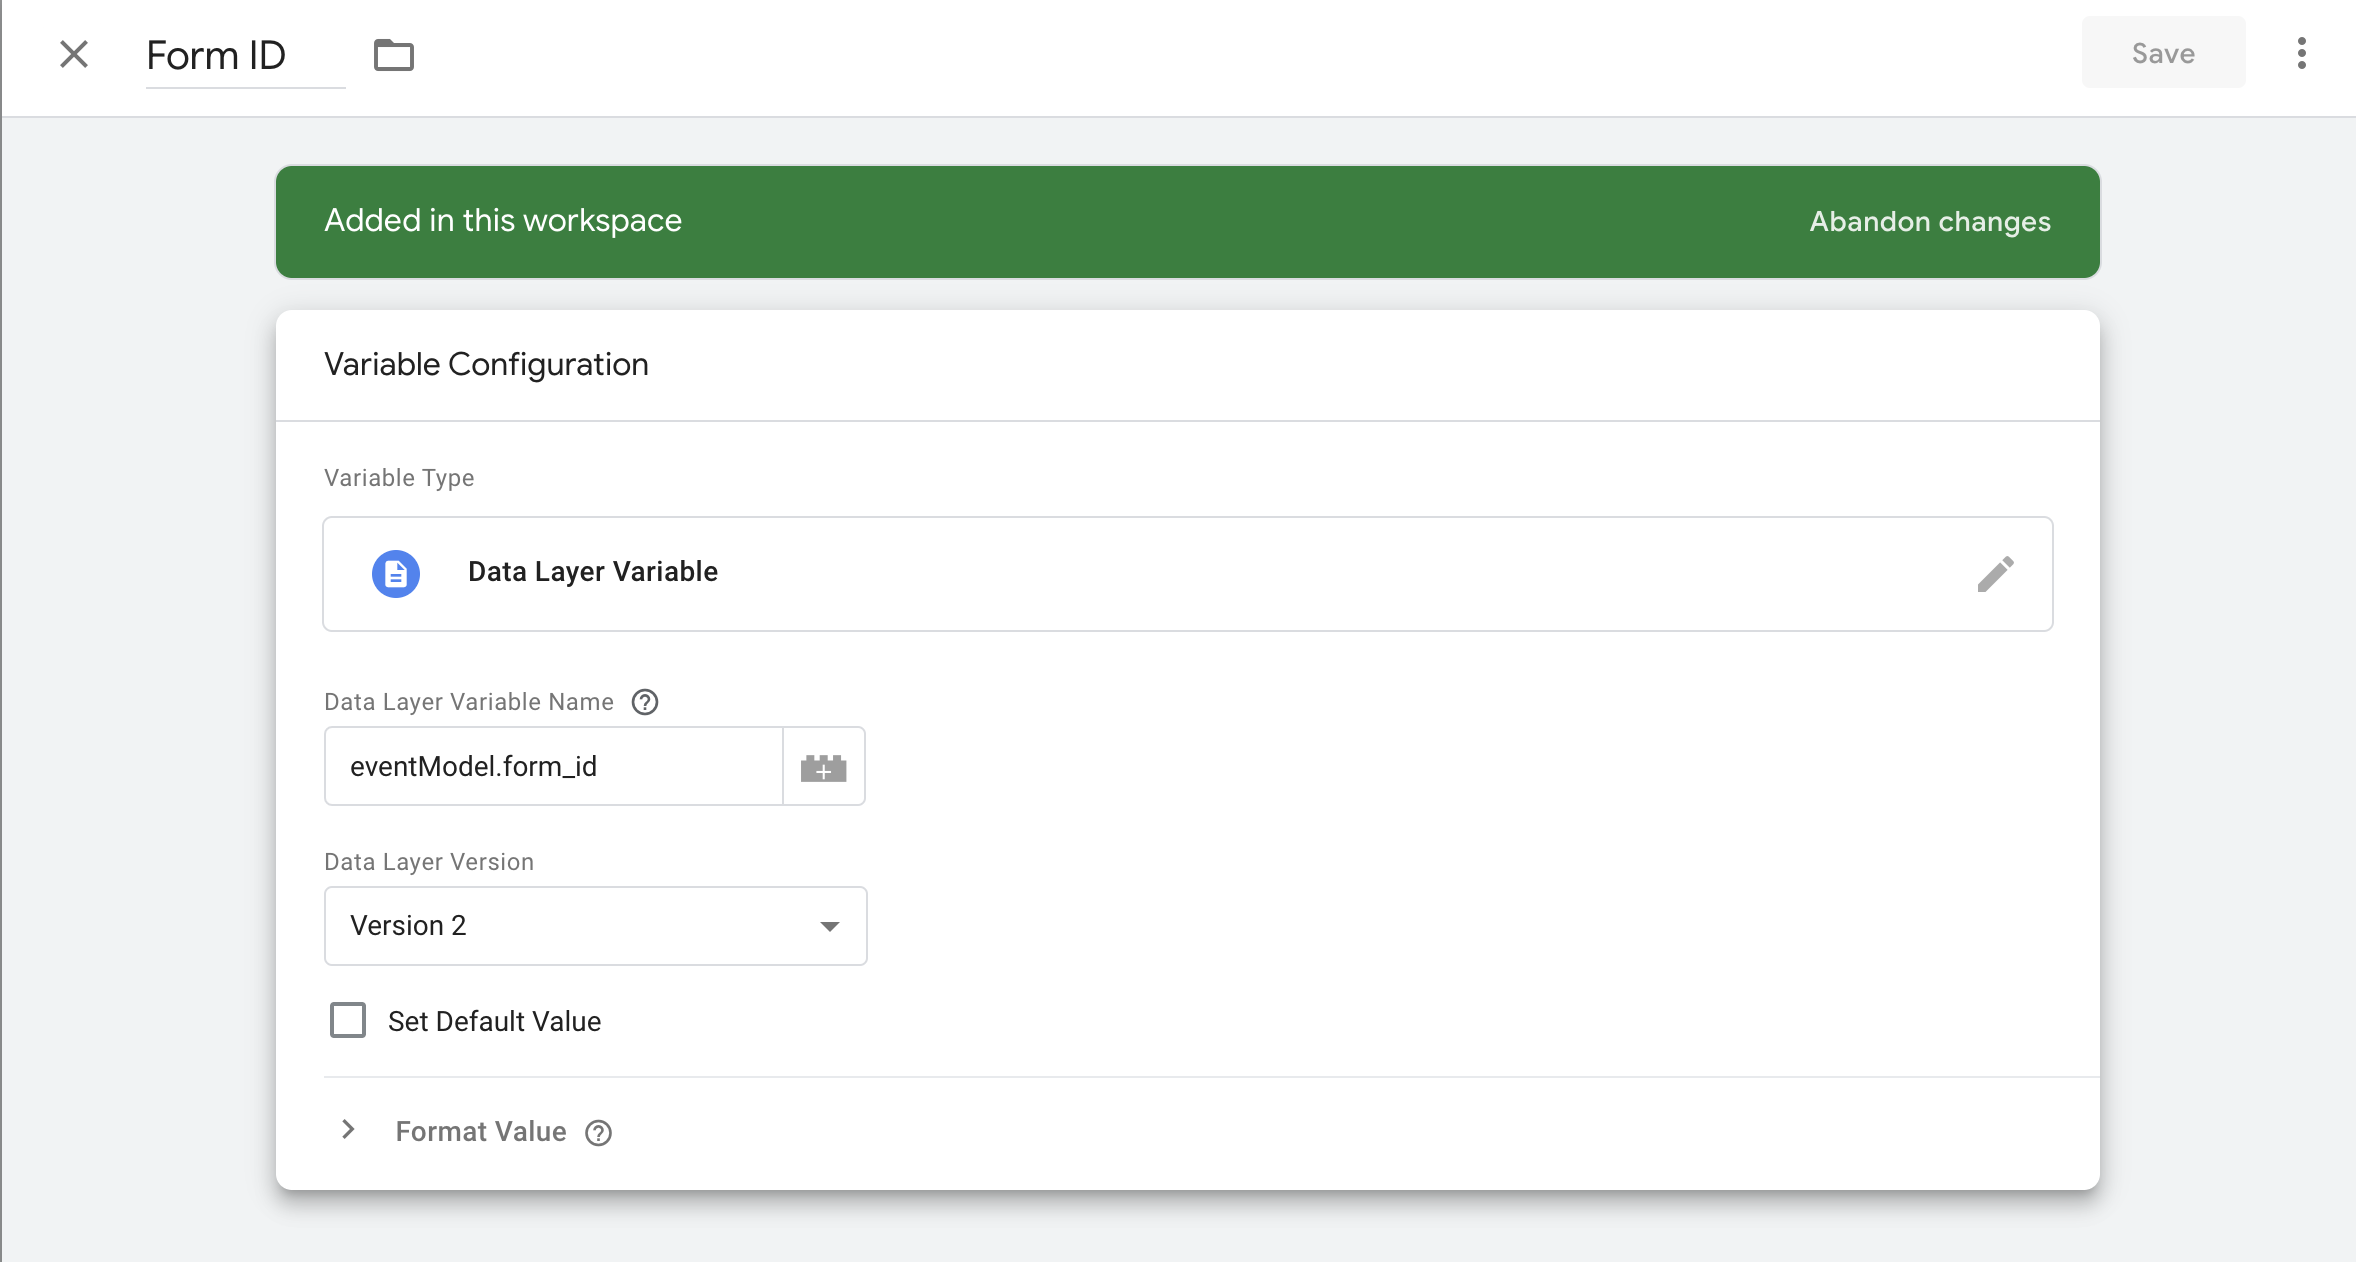
Start by creating two DataLayer variables: form_id and form_name. The DataLayer variable names you’ll use are eventModel.form_id and eventModel.form_name.
2. Create a Trigger
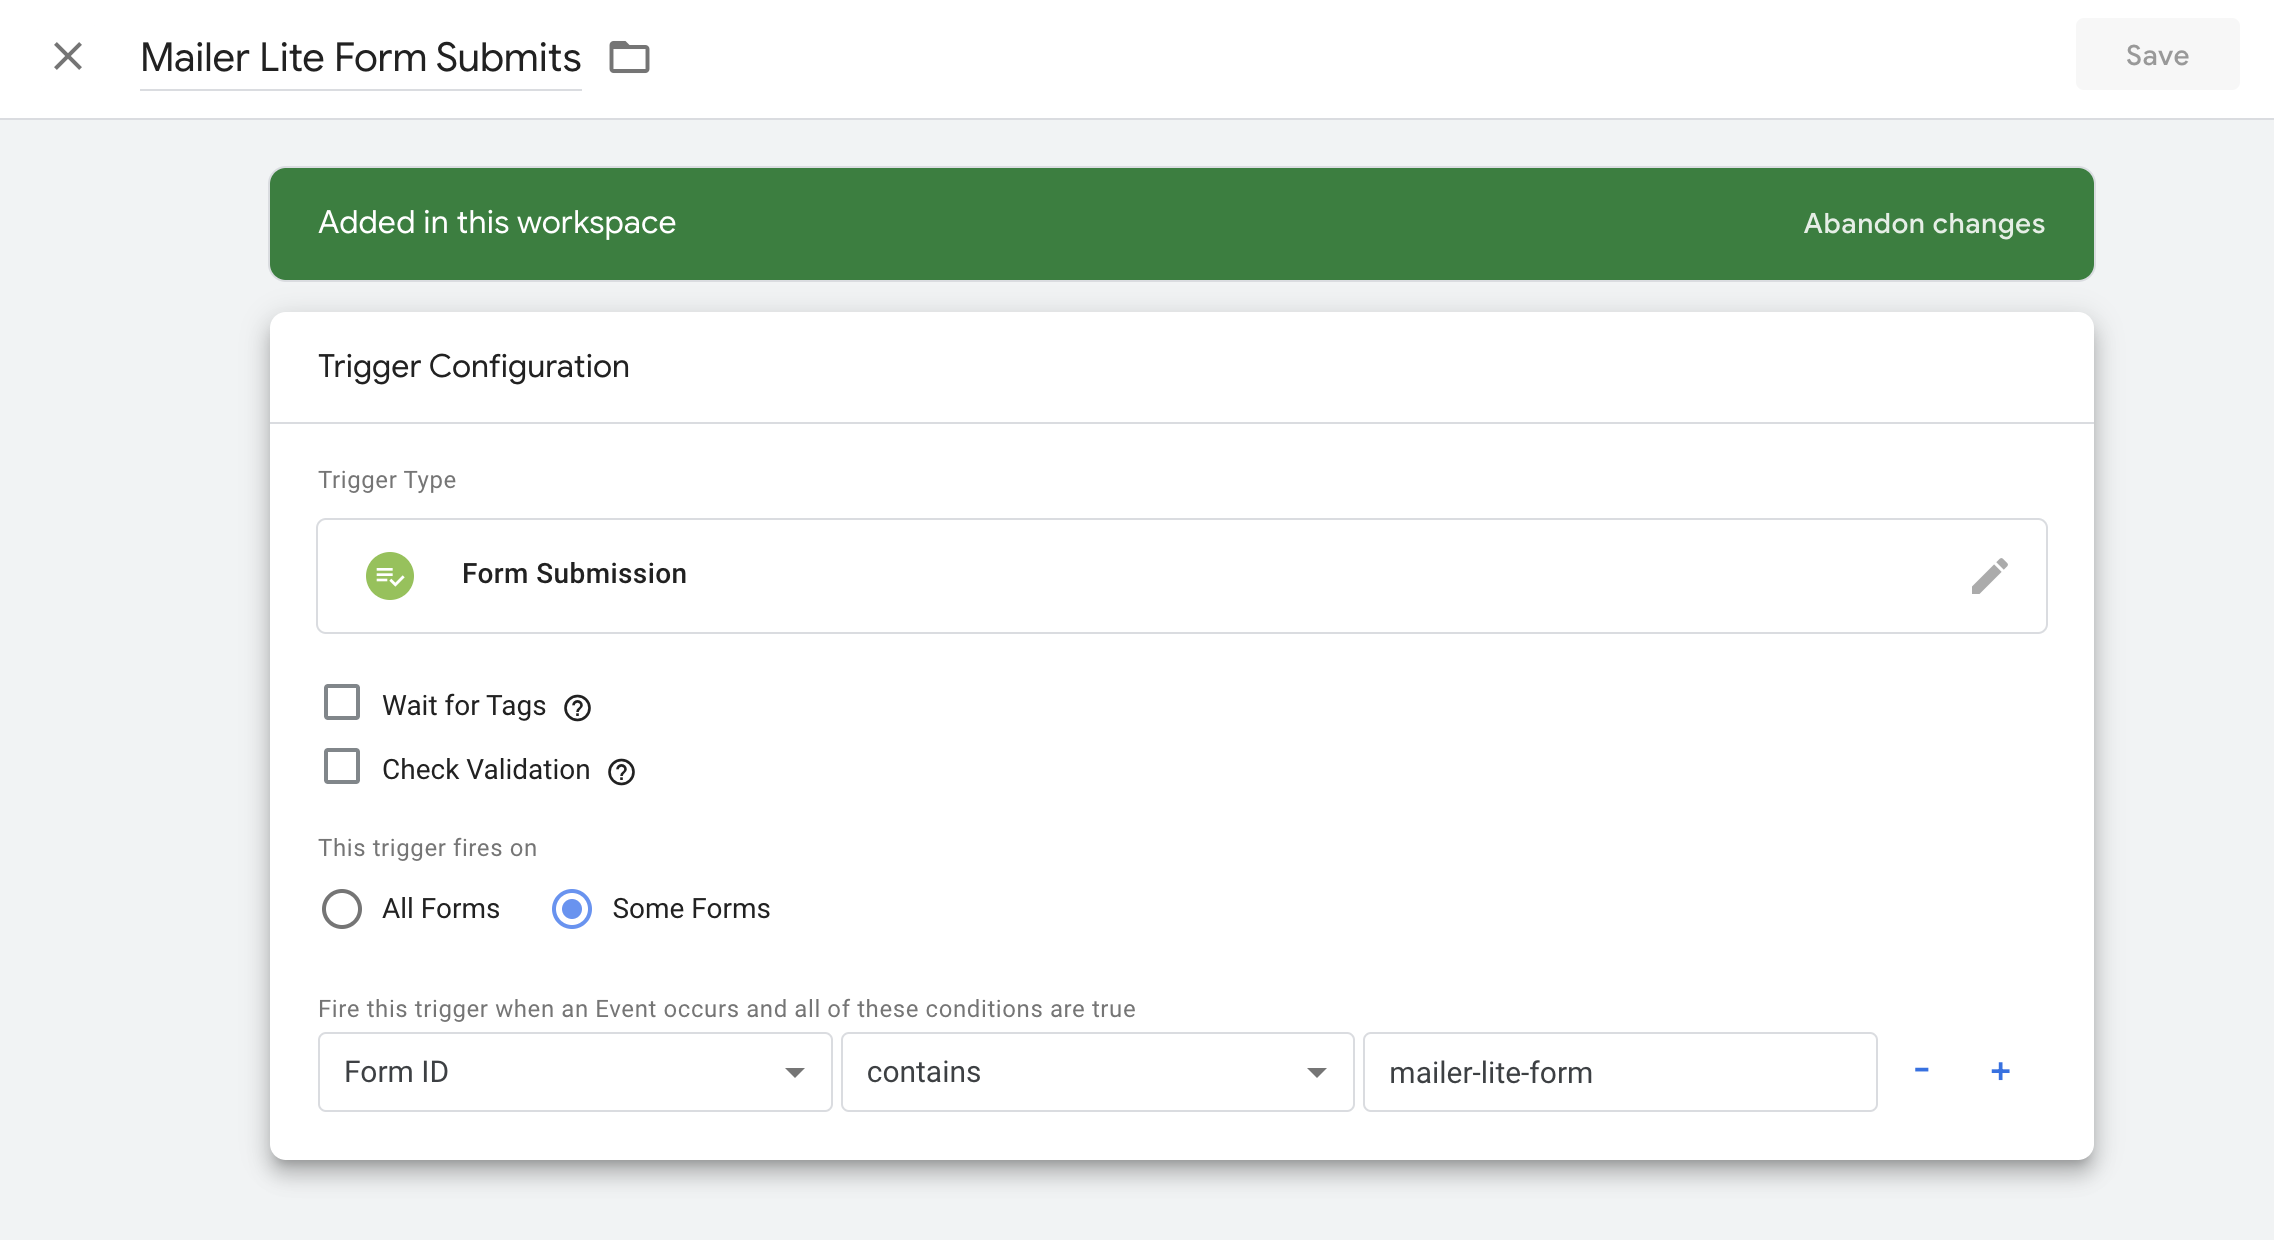
Next, create a trigger named “Mailer Lite Form Submits.” Choose “Form Submission” for the trigger type and select “Some Forms” under conditions. Use the Form ID variable you created and set the condition operator to “contains” with the value “mailer-lite-form” from the above code snippet.
This trigger will now fire every time a form with that ID is submitted. You can now set up a GA4 event tag to send an event name of your choice. Here is how.
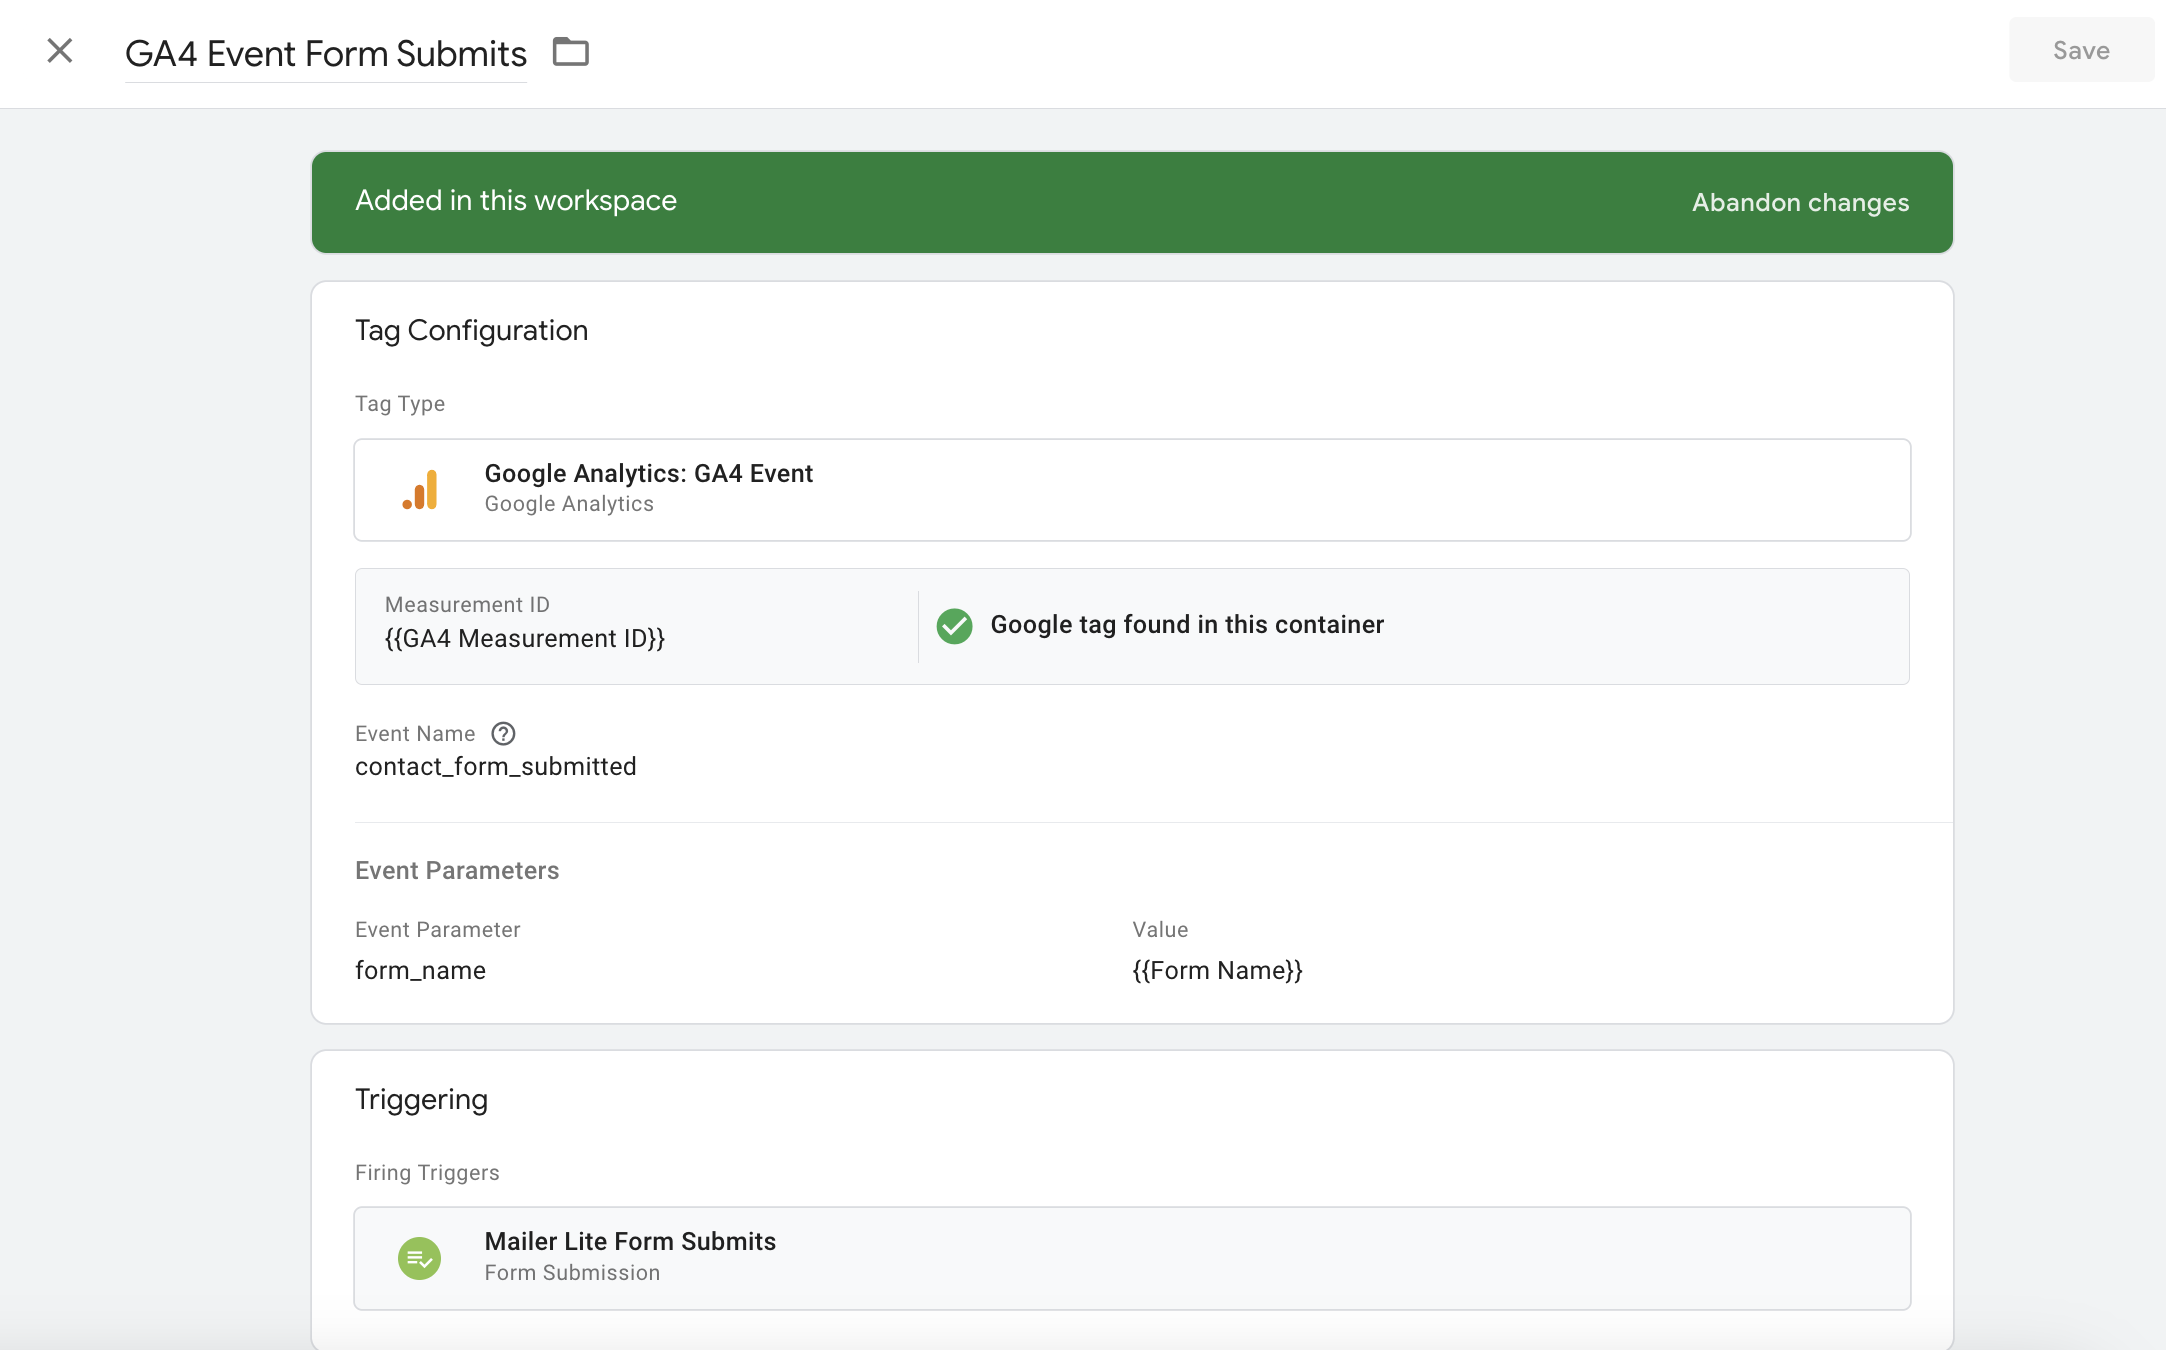
3. Create your GA4 Tag
- Event name: “contact_form_submitted”
- Event parameters:
- form_name: {{Form Name}} (using the form name variable created earlier)
Now, simply select the “Mailer Lite Form Submits” trigger that we just configured.
Congratulations! 🙂
Every time a form with the ID “mailer-lite-form” is submitted, this event will be triggered.
BONUS TIP:
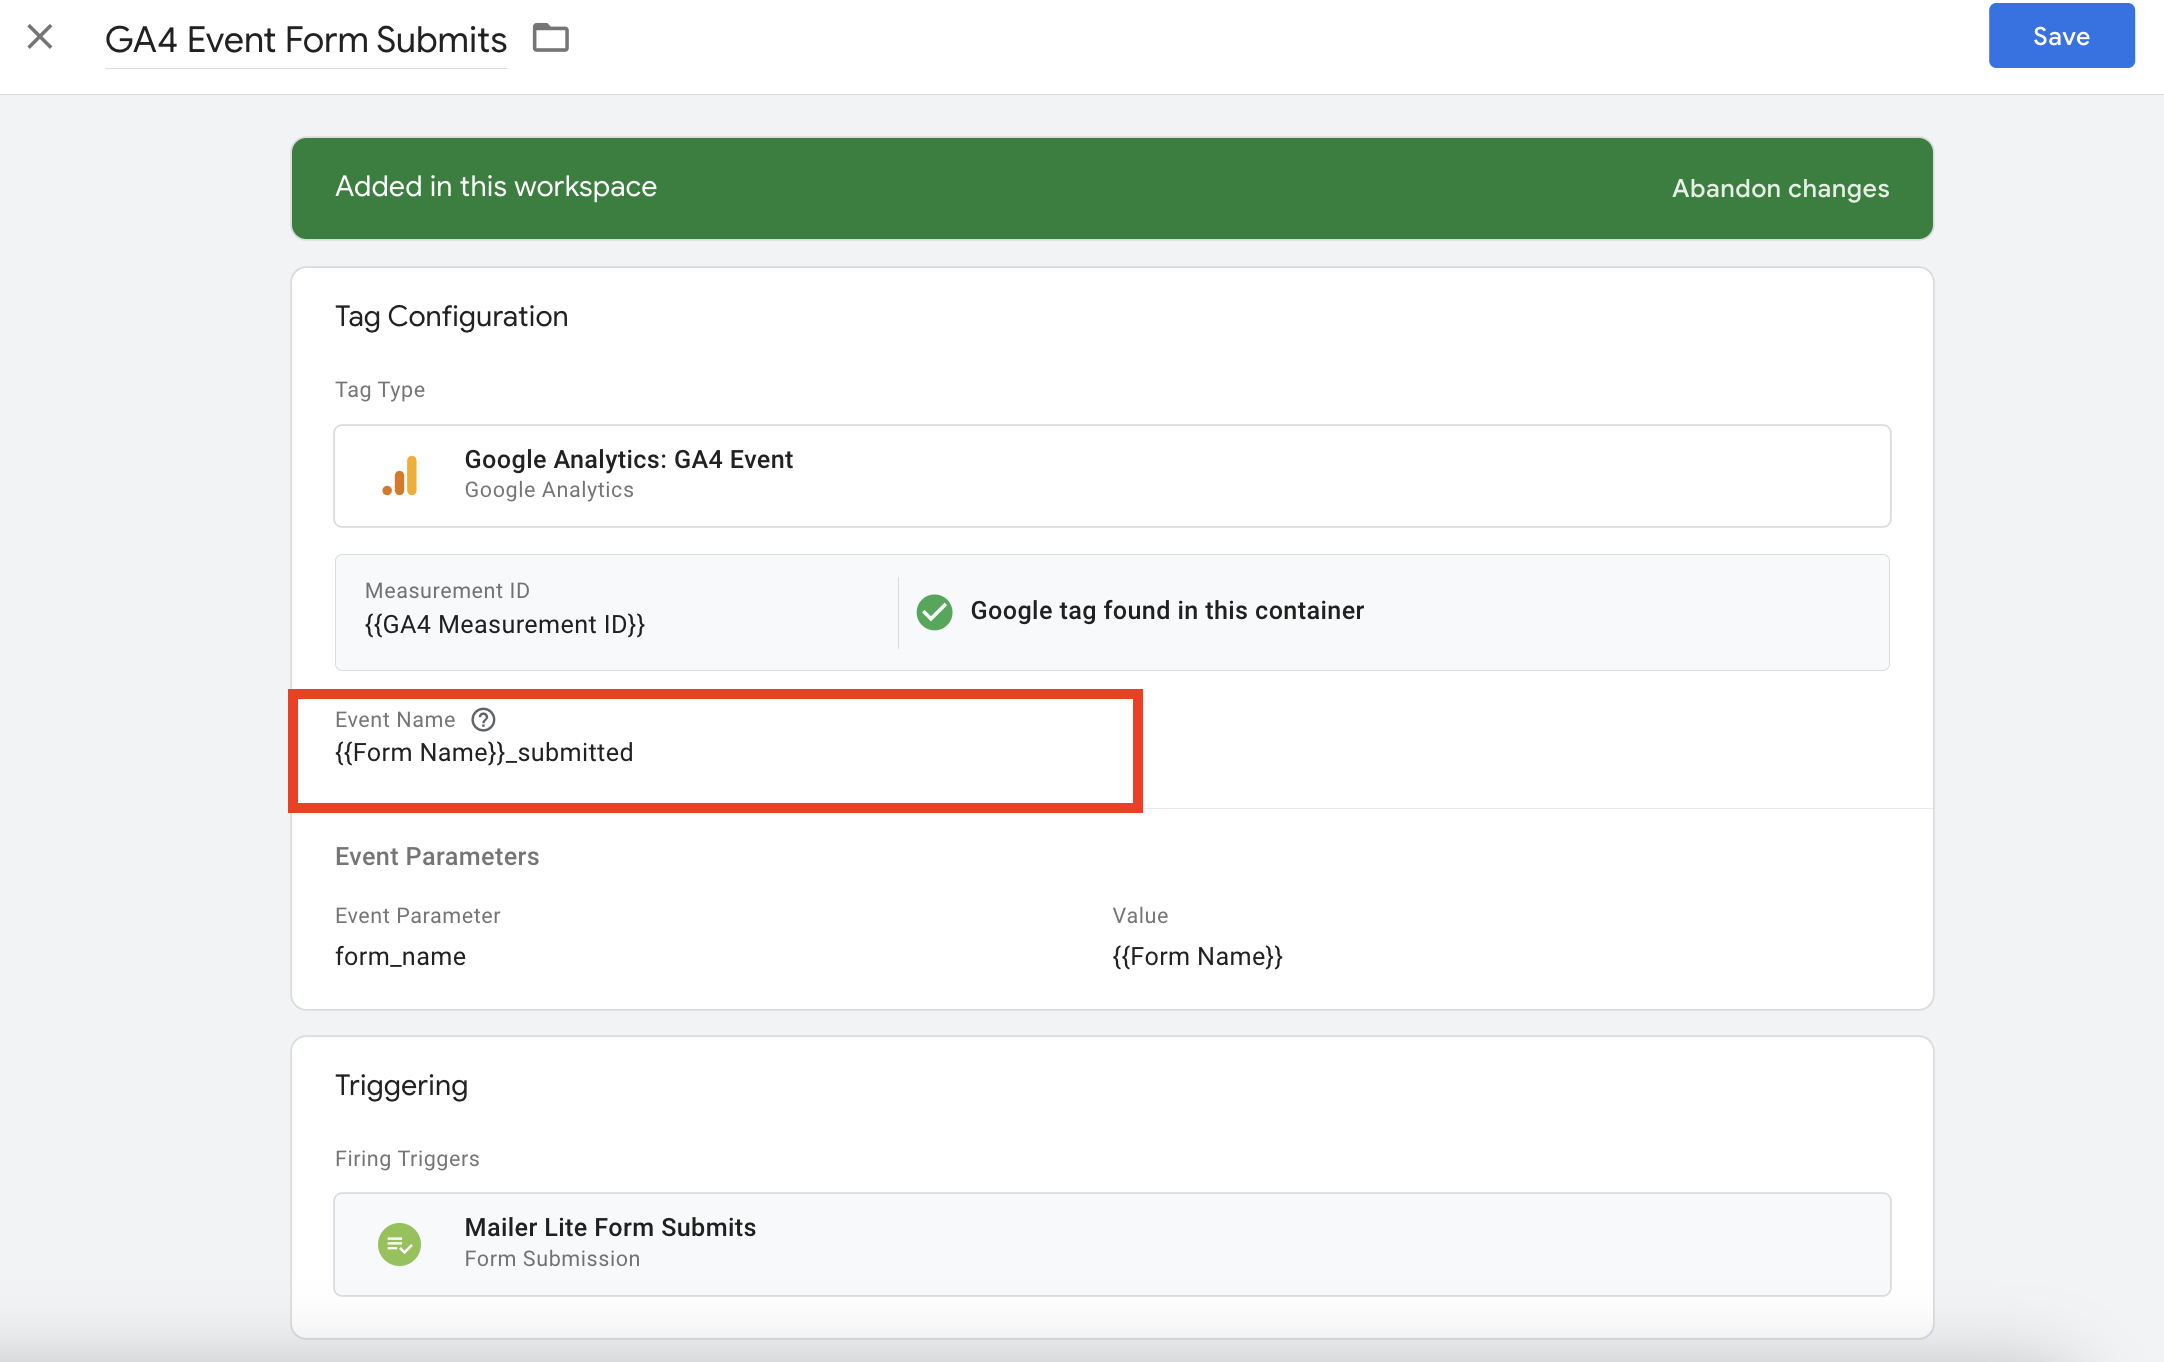
If you have more than one form on the website, you could make this process even more scalable by using the “Form Name” variable and appending a hardcoded “_submitted” to it, indicating which form was submitted.



0 Comments