Technical Guide
See which social post, email, or ad drove views to your YouTube videos.
This guide shows, step-by-step, how to track clicks on the YouTube links you share outside of YouTube—like in emails, WhatsApp, or social posts—so you can see exactly how people find your videos. All of these link clicks are measured directly in Google Analytics (GA4).
Need this implemented?
We can set this up once so you can track all future YouTube video links in GA4.
To track YouTube links, create a trackable redirect link on your own website instead of sharing the direct YouTube URL. When someone clicks the link, Google Tag Manager sends the source, campaign, and video details to GA4 before redirecting the user to YouTube.
When you share direct links to your YouTube videos on multiple platforms, you may get views, but you do not know which how much did a platform contributed. YouTube Analytics shows you sources from within YouTube and search but not direct link shares – your newsletter? LinkedIn? Instagram?
That matters if you promote your YouTube videos across different channels. You need to know which links are actually driving clicks. Otherwise, you may keep spending time and budget on channels that are not contributing much.
One simple way to track this is to use a link shortener like Bitly. That works well if all you need is click data.
Successful YouTubers are passionately data-driven. They know that every little thing adds to the big picture. So looking at click data in isolation is not going to help much (except understanding performance). How do you use this data to improve, is the question? It happens when you create a unified view of the data you collect – there is a reason CDPs are the backbone of large companies. You can do the same by unifying your data in Google Analytics or any other analytics tool you’re using.
Link shorteners keep views data separate from the rest of your analytics. If you want to unify and analyze video clicks along with your website traffic, campaigns, landing pages, and conversions, you usually have to export the data and match it manually.
The method described here solves that differently.
Instead of sending users directly to YouTube, you send them through a lightweight tracking page on your own website. That page sends the click data to GA4 using Google Tag Manager, then redirects the user to the correct YouTube video.
The user still lands on YouTube.
But before they get there, GA4 receives the data you need.
This means you can track YouTube link clicks inside GA4, alongside the rest of your marketing data.
And because the setup is controlled by your own website and GTM container, it can keep working even if you change your link shortener or campaign tools later.
Create a trackable YouTube link
Instead of sharing the direct YouTube link, you create a trackable link on your own website.
When someone clicks that link, they briefly pass through a lightweight page on your site. That page sends the click information to GA4, then redirects the visitor to the correct YouTube video.
So the user still lands on YouTube. But before they get there, GA4 receives the data you need.
The flow looks like this
Normal YouTube link
Newsletter → YouTube
You get the view, but attribution is limited.
Trackable YouTube link
Newsletter → Trackable page → GA4 → YouTube
You get the click source, video title, video URL, and campaign context.
What this helps you measure
With this setup, you can answer questions like:
- Which newsletter drove the most YouTube video clicks?
- Which LinkedIn post sent users to a specific video?
- Which direct link generated views of your product demo video on YouTube?
This is especially useful when YouTube links are part of your campaign activity, but the actual reporting happens inside GA4.
What needs to be implemented
The setup uses three main pieces:
- A reusable redirect page on your website
- This page receives the click and redirects users to the correct YouTube video.
- Query parameters in your video links
- These parameters identify the video, source, campaign, or any other detail you want to track.
- Google Tag Manager and GA4 tracking
- GTM reads the link information, sends the data to GA4, and then redirects the user to YouTube.
The technical guide below explains the full setup, including the intermediate page, GTM variables, lookup tables, GA4 event tracking, and redirect logic. The original implementation uses an intermediate page that reads a video_id, sends tracking data to GA4, and redirects users to the matching video.
Should you use this method?
Use this method if you share direct YouTube links and want better campaign attribution in GA4.
It is a good fit for any type of campaigns that are driving users directly to your video on YouTube. These could be:
- Email campaigns
- LinkedIn posts
- Podcast promotions
- QR codes
- Webinar replays
- Product demo videos
Moreover, it is especially useful when the performance needs to be reported in GA4.
Read the full implementation below and do it yourself or download the full guide as PDF to send it to your developers.
Get this implemented.
We can set it up once so you can track all future YouTube video links in GA4.
Full Implementation in detail
When you share a direct YouTube link in a newsletter, LinkedIn post, paid campaign, QR code, partner campaign, or sales email, YouTube analytics shows you views. But it does not clearly tell you which specific link drove those views.
Did the click come from LinkedIn or other platforms where you shared it?
These sources matter because you want to know which channels are actually helping your videos get watched.
Link shorteners can help you track clicks, and they are a good solution if all you need is basic click data.
But if you want this data inside GA4, alongside your website traffic and campaign data, you need a different setup.
This guide shows how to track direct YouTube video link clicks in GA4 using Google Tag Manager and a lightweight redirect page on your own website.
How the set up works
Instead of sharing the direct YouTube URL, you share a trackable URL from your own website.
For example, instead of sharing:
https://www.youtube.com/watch?v=QdJ9Q5WCEV4
You share:
https://yourwebsite.com/go-to-video/?video_id=1&utm_source=linkedin&utm_medium=organic&utm_campaign=direct-links
When someone clicks this link:
- The user lands on your intermediate page.
- GTM reads the query parameters.
- GA4 receives the click data.
- The user is redirected to the correct YouTube video.
- For the user, the experience stays simple. They click a link and land on YouTube.
- For you, GA4 receives the data before the redirect happens.
What this set up needs
You need four things:
- A reusable intermediate page on your website
- A video list that maps each video ID to a YouTube URL and video title
- GTM variables and tags
- Trackable URLs with query parameters
- The intermediate page is created once and can be reused for all future YouTube videos.
Who this guide is for
This guide is useful if you:
- Share YouTube links across marketing channels
- Want to know which source, campaign, or link drove clicks to your videos
- Prefer keeping click data inside GA4 instead of a separate link shortener report
You will need:
- Access to your website or CMS
- Access to GA4 and Google Tag Manager
- Permission to publish GTM changes
- Basic understanding of URL parameters and GTM variables
- A list of YouTube videos you want to track
Let’s Build the Tracking Setup
Understanding the sources contributing to your YouTube views remains a challenge. We don’t have control over customizing YouTube analytics, but we do have control over our links. If you post a direct link to a YouTube video, like https://youtube.com, how would you know if it was clicked?
Besides using URL shortener services, use the method described here to track sources in your GA4 account.
We will build the setup in this order:
- Decide what information should be captured.
- Choose how the data should be sent to GA4.
- Create a reusable intermediate page.
- Create GTM variables to read the video ID, video title, and video URL.
- Create the GA4 tracking tag.
- Create the redirect tag.
- Test the full flow before publishing.
- Create new trackable links for future videos.
There are two ways to send the data to GA4.
The first method sends the click as a virtual pageview using UTM parameters. This is useful if you want the data to appear under standard GA4 traffic source dimensions.
The second method sends the click as a GA4 event with event parameters. This is usually cleaner if you want to keep YouTube link click data separate from normal website pageview data.
Most of the setup is the same for both methods. The main difference is the GA4 tracking tag you create in Google Tag Manager.
By the end of the implementation, you will have a reusable setup that can work for all future YouTube videos. You will only need to keep your video list updated and create the right trackable links before sharing them.
Now that the concept is clear, let’s walk through the setup in order: what data to capture, how to send it to GA4, how to create the intermediate page, and how to configure GTM so the user is redirected only after the click is tracked.
Step 1: Measurement Planning
Before setting up tags, variables, or redirects, start with the report you want to see in GA4.
This keeps the implementation focused.
For this use case, we mainly want to answer:
- Which video link was clicked?
- Where did the click come from?
- Which campaign or channel drove the click?
- How many clicks did each video receive?
There are two common ways to structure this in GA4.
Option 1: Report clicks as virtual pageviews
In this approach, each YouTube click is sent to GA4 as a pageview.
The YouTube video URL becomes the page URL, and the video title becomes the page title. Source information is passed through UTM parameters such as utm_source, utm_medium, and utm_campaign.
A GA4 exploration that covers all these data points would look like:

Do you notice how Page Location shows you the YouTube URL? That’s a virtual PageView.
This method is useful if you want your click source data to appear under standard GA4 traffic source dimensions.
Option 2: Report clicks as GA4 events
In this approach, each YouTube click is sent as an event.
The event name could be:
video_url_click
Then you send details as event parameters, such as:
The benefit of this option is that you can pass as many parameters you like into an event report.
What data should you capture?
Thanks to our mockup reports, the outcome is clear and visible. That gives our technical work a clear purpose. Before moving further with the setup, let’s summarize what data we are capturing.
At minimum, we’ll capture two things:
1. Click source
For example: LinkedIn, newsletter, Instagram, partner, sales email, paid campaign.
2. Video information
For example: Video title, and YouTube URL.
A simple list of all your videos in a spreadsheet can look like this:
| Video ID | Video Title | YouTube URL |
| 1 | Generate an API Secret in GA4. | https://youtube.com/… |
| 2 | HubSpot Traffic Sources Report. | https://youtube.com/… |
| 3 | Avoid Page Refresh Event Count | https://youtube.com/… |
The Video ID is your own assigned ID (internal) and not to be confused with the YouTube Video ID.
We use the Video ID later to connect the trackable link with the correct video title and YouTube URL.
Step 2: Choose your tracking method
There are two good ways to send this data to GA4.
Option 1: Virtual pageviews with UTM parameters
In this method, the click is sent to GA4 as a pageview.
The source data is passed through UTM parameters, and the video data can be passed as the virtual page URL and page title. Example URL:
https://yourwebsite.com/go-to-video/?video_id=1&utm_source=linkedin&utm_medium=organic&utm_campaign=direct-links
Use this method if you want the source data to appear under standard GA4 traffic source dimensions.
The trade-off is that video click data may mix with normal website pageview and traffic source reporting.
Option 2: GA4 events with query parameters
In this method, the click is sent as a GA4 event.
Example URL:
https://yourwebsite.com/go-to-video/?video_id=1&vid_source=linkedin
You can send the video title, YouTube URL, source, campaign, or any other useful information as event parameters.
Use this method if you want cleaner separation between website pageviews and video link clicks.
Implementation
The implementation has two main parts:
- Create the intermediate page
- Set up GTM variables and tags
Step 1: Create the intermediate page
Create a simple page on your website.
Example:
https://yourwebsite.com/go-to-video/
This page should contain your normal GTM container code.
Add a message container to the page (optional – decide if you want to show a message like give below):
<div id="message-container"></div>
Then add this JavaScript to the page footer:
<script>
       function getQueryParameter(name) {
           const urlParams = new URLSearchParams(window.location.search);
           return urlParams.get(name);
       }

       document.addEventListener("DOMContentLoaded", function() {
           const videoId = getQueryParameter('video_id');
           const messageContainer = document.getElementById('message-container');

           if (videoId) {
               messageContainer.innerHTML = `
                   <div>
                       <p class="mt-3" style="font-weight:200;font-size:1.75rem;color:#6d59ff">Hang on while we take you to the video :)</p>
                   </div>
               `;
           } else {
               messageContainer.innerHTML = `
                   <div>
                       <p style="font-weight:200;font-size:1.75rem;color:#6d59ff">Uh oh! We could not understand that request. <br>Go to our YouTube channel directly.</p>
                       <a href="https://www.youtube.com/@trackfunnels/videos" class="btn btn-primary">Go to YouTube Channel</a>
                   </div>
               `;
           }
       });
   </script>
Replace the YouTube channel URL (highlighted in red) with your own fallback URL.
This script checks whether video_id exists in the URL. If it exists, the page displays a waiting message. If it does not exist, the page shows a fallback message and link.
The actual redirect happens through Google Tag Manager.
You can style the page however you want. The above Javascript uses some basic styling to the display messages.
Few things to remember
- Make sure the page contains GTM tracking code just as its recommended to be present on every page
- Swap the red highlighted URL in the JS code with your own YouTube channel, or if you do not have one – swap it with anywhere you’d like to take users in case they stumble upon this page by accident.
Here is how our intermediate page looks like when a video_id is present in the URL.

Step 2: Create the GTM variables
Create three variables in Google Tag Manager.
1. video_tracking_url_id
Variable type: URL
Component type: Query
Query key: video_id
2. video_click_tracking_title
Variable type: Lookup Table
Input variable: {{video_tracking_url_id}}
Use this variable to map each video ID to the correct video title.
Example:
3. video_click_tracking_url
Variable type: Lookup Table
Input variable: {{video_tracking_url_id}}
Use this variable to map each video ID to the correct YouTube URL.
Example:
Set a default value, such as your YouTube channel URL, so users are not stranded if the lookup fails.
Step 3: Test the variables
Open GTM Preview Mode and test one of your video, e.g.:
https://yourwebsite.com/go-to-video/?video_id=1
Change red highlighted part with the ID you used in Google Tag Manager variable Lookup tables.
Check that all three variables return the correct values:
video_tracking_url_id
video_click_tracking_title
video_click_tracking_url
Only continue once the values are correct. We use an intermediate page with video id = 1 for testing
http://trackfunnels.com/utm-links-builder/demos/go-to-video/?video_id=1

GTM Tags
We’ll now set up 2 types of tags
The Redirecting Tag: This is a custom HTML tag that makes sure that users are redirecting to the correct video when they click on the link
The Tracking Tag: This is a GA4 tag that will send data to your GA4 account depending on what method you use.
- A Google tag (if you are using UTM Tracking)
- An event tag (if you are using Event tracking)
Step 4: Create the redirect tag
Tag type: Custom HTML
Add new tag > choose custom html > paste the below script
<script>

var videoUrl = {{video_click_tracking_url}};
if (videoUrl) {
  setTimeout(function() {
    window.location.href = videoUrl;
  }, 3000);
} else {
  setTimeout(function() {
    window.location.href = 'https://www.youtube.com/@trackfunnels/videos';
  }, 3000);
}
</script>
Change the red-highlighted parts in the script with your own values e.g. the fallback URL.
The 3-second delay gives GA4 enough time to receive the tracking hit before the user is redirected. You can reduce the delay if the page is lightweight and your testing confirms the GA4 hit is sent reliably.
Do not add a normal trigger to this tag.
This redirect tag should fire through tag sequencing after your GA4 tracking tag fires. We’ll create this next.

Step 5: Create the GA4 tracking tag
You should now choose the tracking method.
Method A: Virtual pageview with UTMs
Create a new Google Tag.
In the tag configuration, override:
page_location = {{video_click_tracking_url}}
page_title = {{video_click_tracking_title}}
Trigger:
Create a trigger for the intermediate page. Add to the above tag.
Example trigger condition:
Page Path contains /go-to-video/
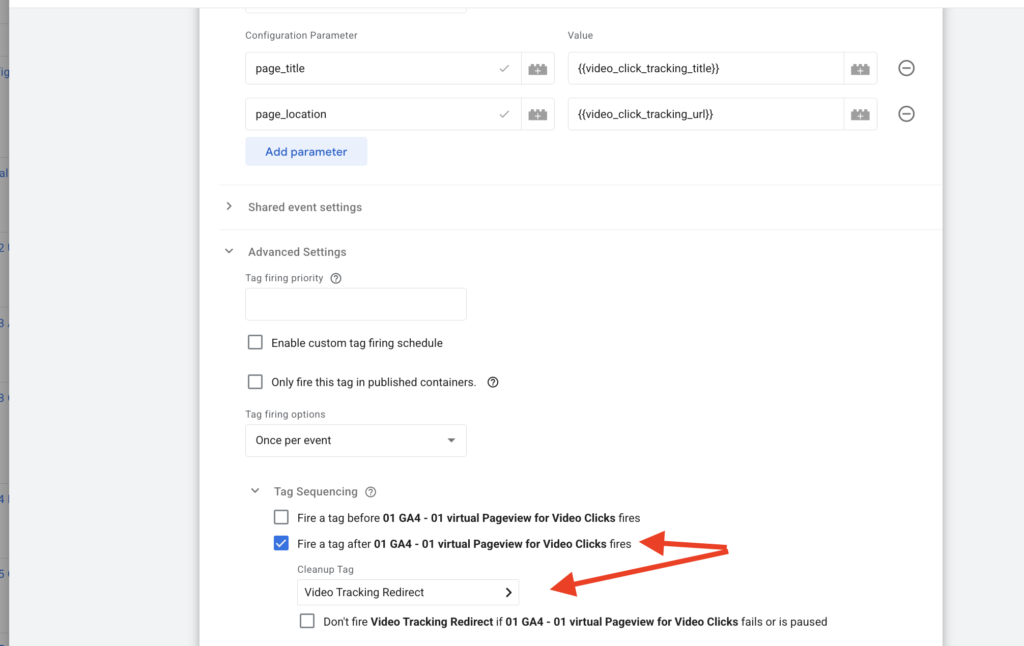
Finally, use tag sequencing to fire the redirect tag after this tracking tag.
Change your main Google Tag:
Add this trigger as an exception to your main Google Tag, so the main tag does not also fire on the intermediate page.
This avoids double-counting pageviews.

Test with a URL like:
https://yourwebsite.com/go-to-video/?video_id=1&utm_source=linkedin&utm_medium=social
Check GA4 DebugView to confirm the pageview contains the correct source, page URL, and page title.
I am testing it with the following URL
I have appended utm_source and utm_medium to the URL
http://trackfunnels.com/utm-links-builder/demos/go-to-video/?video_id=1&utm_source=linkedin&utm_medium=social
See how this information can be seen populated in GA4 debug view.
Method B: GA4 event tracking
Create another URL variable for the source.
Variable name: video_click_tracking_source
Variable type: URL
Component type: Query
Query key: vid_source
Create a GA4 Event tag.
Event name: video_url_clicks
Add the following Event parameters and values
| Parameter | Value |
| video_title | {{video_click_tracking_title}} |
| video_url | {{video_click_tracking_url}} |
| video_source | {{video_click_tracking_source}} |
| video_id | {{video_tracking_url_id}} |
Use tag sequencing to fire the redirect tag after this GA4 event tag.
Trigger:
Trigger this tag only on the intermediate page.

Check GTM Preview Mode and GA4 DebugView to confirm the event and parameters are sent correctly.
We test with the following URL:
http://trackfunnels.com/utm-links-builder/demos/go-to-video/?video_id=1&vid_source=linkedin
Step 6: Create new trackable links
After the setup is complete, creating links becomes a repeatable process.
For every new video:
- Add the video ID, title, and YouTube URL to your GTM lookup variables.
- Create a trackable link using your intermediate page.
- Add the correct video_id.
- Add source, medium, campaign, or other query parameters.
- Test the link before sharing it.
Example:
https://yourwebsite.com/go-to-video/?video_id=4&utm_source=newsletter&utm_medium=email&utm_campaign=product-demo
Or, if you use event tracking:
https://yourwebsite.com/go-to-video/?video_id=4&vid_source=newsletter
Limitations of this setup
This setup gives you cleaner GA4 reporting, but it adds some maintenance.
The main limitation is that your video list must stay updated in GTM. Every time you create a new video, you need to add a new video ID, title, and URL.
The second limitation is link creation. Instead of copying the YouTube URL directly, you need to create a trackable URL using the intermediate page and query parameters.
These are the trade-offs for getting YouTube link click data inside GA4.
If you want to reduce manual work, you can automate link creation with Zapier. For example, you could submit a YouTube URL through a form and receive the final trackable link automatically.

0 Comments