The method described here works when you set your Buy button settings for “Action when people click” to “Add product to cart”. For the other setting, a different method is used. I’d encourage you to first go through the overview article about Shopify Buy button and passing UTM parameters. The overview also explains how to test and what to do if you encounter errors.
How to pass UTM Parameters into Shopify's Product Buy Button - for Add Product to Cart Settings
Use this implementation with "Add Product to cart" settings in your Buy Button configuration. The article is slightly technical but don't worry. I've simplified it enough so someone without coding experience can follow too.

The pain of iFrame
You need to know that when you add a Shopify Buy Button to a page, it utilizes an iFrame. iFrames are a big pain in the tracking world. See more on how to work with iFrame tracking on Simo’s awesome blog. But in this implementation, you’ll not need it 😉
However, if your landing page is on a different domain than your Shopify store, you need to make sure that cross-domain tracking is implemented.
Next, I am assuming that you know at least some Javascript to understand this. If you don’t, just try to follow the instructions in this post “as is” and you should be good. But if for some reason not, then feel free to ask in the comments below.
A couple of things before we kick-off —
This implementation is not as much about making changes to your landing page as it is about adjusting your Shopify Buy Button code.
You have most likely created your Shopify Buy Button as shown in this article and added it to your HTML as explained in this article.
(Unbounce users will follow this article)
Ok, that’s a lot of articles but those complete the groundwork.
Let’s customize and get your UTM parameters
Code Customization
We’ll first look at grabbing the UTM parameters from the landing page URL and using them in your checkout process. Next, we will look at how to customize the Buy Button code to hard-code the UTM parameters. I don’t like hard coding stuff myself but sometimes you may want to keep things simpler and change it for every button, for example, to (perhaps) categorize them as a different traffic sources.
Passing UTM Parameters from the landing page URL to Shopify Buy Button
As you might already know, there are 2 parts to the Shopify buy button code – one is the Javascript and the other HTML. HTML is a simple line, so we are not going to worry about that.
    // Function to capture UTM parameters from the URL
    function getUTMParameters() {
        var params = {};
        var parser = document.createElement('a');
        parser.href = window.location.href;
        var query = parser.search.substring(1);
        var vars = query.split('&');
        for (var i = 0; i < vars.length; i++) {
            var pair = vars[i].split('=');
            if (pair[0].startsWith('utm_')) { // Ensure only UTM parameters are captured
                params[decodeURIComponent(pair[0])] = decodeURIComponent(pair[1]);
            }
        }
        return params;
    }

    var utmParams = getUTMParameters();
    var serializedUTMParams = Object.keys(utmParams).map(function(key) {
        return key + '=' + utmParams[key];
    }).join('&');
Place this snippet between
(function () {
and
var scriptURL =
in your Shopify code. These are most likely lines 3 and 4 of your Shopify button code.
Once the UTM parameters are extracted from the URL, we pass them to the checkout button by adding the following code to the script:
    events: {
        afterInit: (cart) => {
            cart.onCheckout = () => {
                const checkoutUrl = cart.model.webUrl + '&' + serializedUTMParams;
                // we dynamically change the checkout function.
                cart.checkout.open(checkoutUrl);
            };
        },
    }
What we are really doing here is utilizing Shopify’s lifecycle hooks for running custom functions as given in the Shopify BuyButton.js customization options. (Scroll down to “events”) to see all hooks.
We add this inside the “cart” object of the script.
How to add this code?
Your Shopify button code contains 2 functions. A Function to load the script and another one to initialize the Shopify Buy. If you use a text editor, this will look like below (check line 30 and 37):

Next, expand the function on line 37 and you will see this:
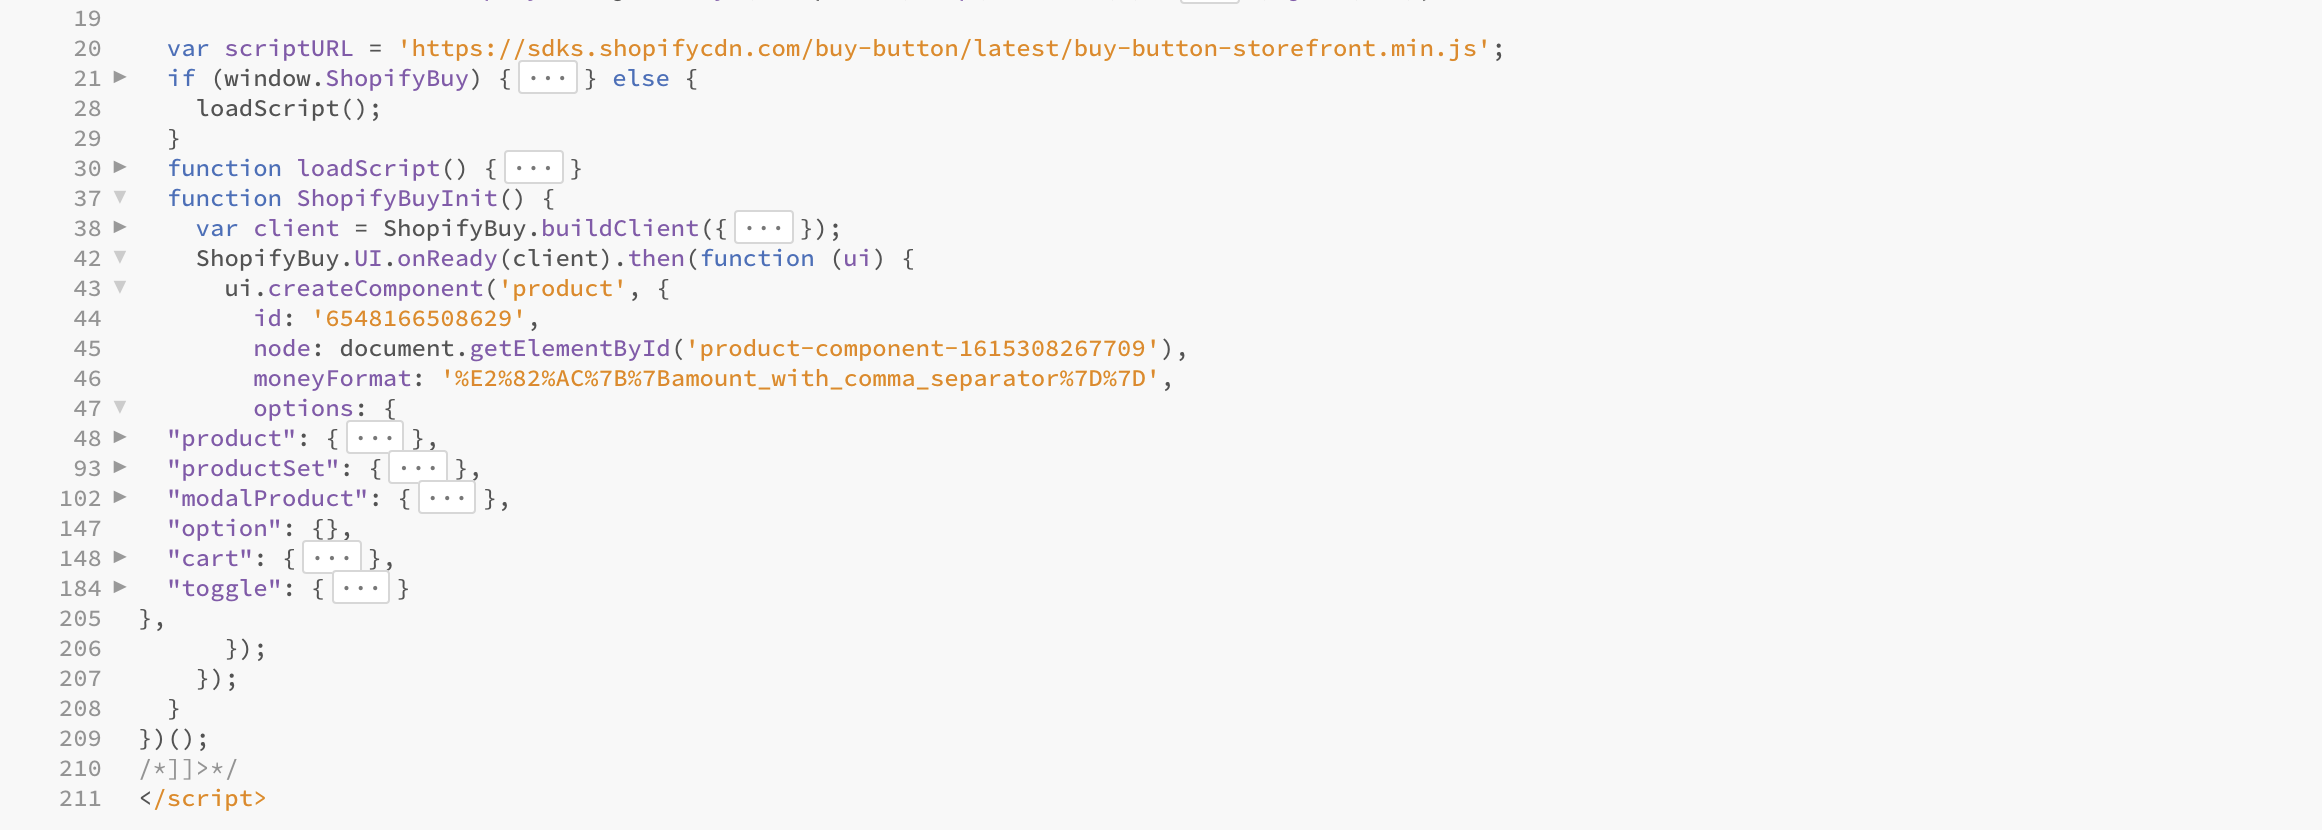
These are all the UI options and other settings you saved when creating the button. We are not going to deal with these options much. Rather, our interest is in the “Cart” object of this function that you see on line 148. I’ll expand that now:

Notice line 148, marked by the red arrow. Thats where the “cart” object starts. Simply add right after this line. It will look like this:

And that’s it.
Check how I did that by placing buy buttons on a sample Unbounce page. I demonstrate its functioning in both cases – whether you choose the checkout behavior to open in a new tab or the same tab – have a look.
When Checkout opens in a new tab
When Checkout opens in the same tab
Hard-coding UTM Parameters to Shopify Buy Button
If you’d like to hard code UTM parameters to the buy button for whatever reasons (like say if you have multiple landing pages with the same button and you want to attribute the landing page rather than traffic source), you could do that by quite simply modifying the “event” code we added earlier.
This is how the code will look like.
events: {
    afterInit: (cart) => {
        cart.onCheckout = () => {
            const checkoutUrl = cart.model.webUrl + '&' +'utm_source=test&utm_medium=test&utm_campaign=test&utm_content=test&utm_term=test';
            // we dynamically change the checkout function.
            cart.checkout.open(checkoutUrl);
        };
    },
},
Notice the UTM values I have added. I have used test values in all parameters but feel free to assign your own values.
Let us know if you hit any issues.
What happens if your landing page URL does not have UTM Parameters?
If your landing page does not have UTM parameters, nothing will pass through of course. Because there will not be any UTM parameters to extract and modify the checkout URL.
Are there any other additional steps to take?
In the overview article, about passing UTM parameters to Shopify buy buttons, I give some context on proper UTM attribution in both GA4 and Shopify.
Want to pass other parameters along with UTM parameters?
If you want to pass more parameters and not just UTM parameters into your checkout page, just update the UTM parameters extract function in our first step to the following.
// Function to capture all URL parameters
function getAllURLParameters() {
    var params = {};
    var parser = document.createElement('a');
    parser.href = window.location.href;
    var query = parser.search.substring(1);
    var vars = query.split('&');

    for (var i = 0; i < vars.length; i++) {
        var pair = vars[i].split('=');
        if (pair[0]) { // Ensure there's a key before adding
            params[decodeURIComponent(pair[0])] = decodeURIComponent(pair[1] || ''); // Handle cases where value might be empty
        }
    }
    return params;
}

var allParams = getAllURLParameters();
var serializedParams = Object.keys(allParams)
    .map(function(key) {
        return key + '=' + encodeURIComponent(allParams[key]); // Encode values to ensure safe URL format
    })
    .join('&');
and update the event object as follows
    events: {
        afterInit: (cart) => {
            cart.onCheckout = () => {
                const checkoutUrl = cart.model.webUrl + '&' + serializedParams;
                // we dynamically change the checkout function.
                cart.checkout.open(checkoutUrl);
            };
        },
    }
Let me know in the comments if this worked for your particular use case. If not, get in touch with us and we’ll help you set it up!

10 Comments
Evan
I do not see the buybutton.js in the code files in the backend of Shopify. Can you place the script part of this on the page itself that has the buy button on it?
Mark
Hi Malik
now I am getting this in the console:
[DOM] Input elements should have autocomplete attributes (suggested: "username"): (More info: https://goo.gl/9p2vKq)
Mark
Hey Malik
is it possible that Shopify changed the embed code somehow? I can not get it to run. Can I send you the complete code somehow?
Best
Mark
Mark
Hey Malik
is it possible that Shopify changed the embed code somehow? I can not get it to run. Can I send you the complete code somehow?
Best
Mark
RichP
events: needs to "events": or the buy button doesn't work (at least for me on a WordPress site)
Thanks for this code those, will be testing it this week.
AM
Hi Malik,
Thanks for this article. Wordpress seems to not like this line - var regex = /?&=([^&#])/g. Throws up a 403 error. Any ideas?
Thanks!
Tim Clark
Hi Malik,
Thank you for posting the additional details. I've made the modifications to my Buy Button, but am sadly not seeing any indication on the Shopify site that the UTM parameters are making their way through. I'm viewing the Shopify Report (Sales Attributed to Marketing) and am not seeing any UTM there.
Thanks again!
-Tim
admin
Hi Tim,
thanks for dropping by. The above method allows you to pass the UTM parameters from the landing page to when a user clicks on the "Buy Button". Once you have implemented this, you will have to give it some time for the data to come through. My advice would be to always test things post-implementation. It's possible the code is not implemented correctly (happens all the time) - try checking the console for any errors.
Malik