Pass UTM Parameters to track source of Calendly Booking Forms without Fail

In this article, we will explore how to use Calendly's Advanced Embed to ensure that UTM parameters are consistently captured, regardless of how users access the booking form. Whether users are directed to the Calendly booking link, navigate away, or return to the page later without UTM parameters, our approach will preserve and track these details. We achieve this by utilizing cookies to store the UTM parameters for future visits but also making sure that the cookie is read and UTMs passed into Calendly bookings.

You’ll perhaps agree that Calendly provides a simple and user-friendly way to embed booking forms. You may also be aware that these booking forms have a built-in functionality to capture UTM parameters (No? you do now!). The catch is – UTM parameters have to be passed either through the Calendly URL or the page where the form is embedded. Good news is no additional customization is needed.

However, capturing UTM parameters can become challenging when users navigate away from the Landing page. In many cases, users may leave the landing page or revisit the booking form later directly (i.e. without the UTM parameters). To avoid missing crucial attribution data, it’s important to plan for such scenarios.

A crude approach is to hardcode UTM parameters into your Calendly links across your website. For example, if all your pages have a “Schedule an Appointment” button that directs users to the Calendly booking form like in the site navigation, you might consider embedding UTM parameters directly into the link – not a good idea – hardcoding UTM parameters results in the same values being passed for all users, regardless of how they arrived at your site, leading to inaccurate appointment attribution. Even though Google Analytics 4 may report on all the traffic sources, our intention here is to get them in your Calendly reports.

In reality, you may not always link directly to your Calendly booking page in your promotions (like Facebook ads) particularly if the form is embedded within a standalone page. This would be like sending users directly from a Facebook or LinkedIn ad to a page that just has your booking form. So, for better attribution tracking, we recommend considering more dynamic methods of capturing UTM parameters to ensure accurate data collection, even if users navigate away from the page.

Let’s explore two common scenarios:

Case 1: Your landing page has the Calendly Booking Form

If your landing page includes both the Calendly booking form and key information about your product or service (such as benefits, features, and offers), the UTM parameters will be captured seamlessly as long as the user books an appointment without navigating away. Calendly’s built-in mechanism ensures that UTM parameters are passed and stored correctly, so there’s nothing to worry about in this scenario.

Case 2: Your landing page has the Calendly Booking Form, BUT a user may navigate away

In this case, your landing page may also contain links to other parts of your website, potentially causing users to navigate away before booking. If the user clicks away to another page and then returns to book an appointment, the original UTM parameters are lost. Google Analytics 4 will tie the visit and booking back to the original UTMs (depending on your implementation). However, Calendly’s default embed will no longer be able to capture the UTM data.

To avoid this, you should:

1. Store UTM parameters in cookies (with proper user consent).
2. Use Calendly’s Advanced Embed to retrieve the UTM parameters from cookies and pass them along during the appointment booking process.
This way, even if the user navigates away, your UTM tracking remains intact and your marketing attribution remains accurate.

What is Advanced Calendly Embed?

Calendly offers 2 types of embed – the General Embed and the Advanced Embed. Advanced Embed allows you to play with Calendly’s functions to manipulate the bookings e.g. pre-filling invitee questions.

This will allow you to delay the appearance of the embed until specific actions are completed, or until information is collected to be used for pre-filling the booking form.

In this article, we’ll use Advanced Embed to “set” the UTM parameters that we’ve stored in the cookies instead as a fallback when the default UTM capturing feature of Calendly fails. There are 2 steps involved.

Step 1: Store UTM Parameters in cookies.

To see how that can be done either directly on your website code or using GTM Manager, check out our article on how to store UTM parameters in cookies.

Cookie Permissions

Most likely you may not have to separately take permissions for this cookie in your consent management platform since this falls under Marketing and Statistics permissions and assuming you are already taking consent for those. However, check with your legal team anyway.

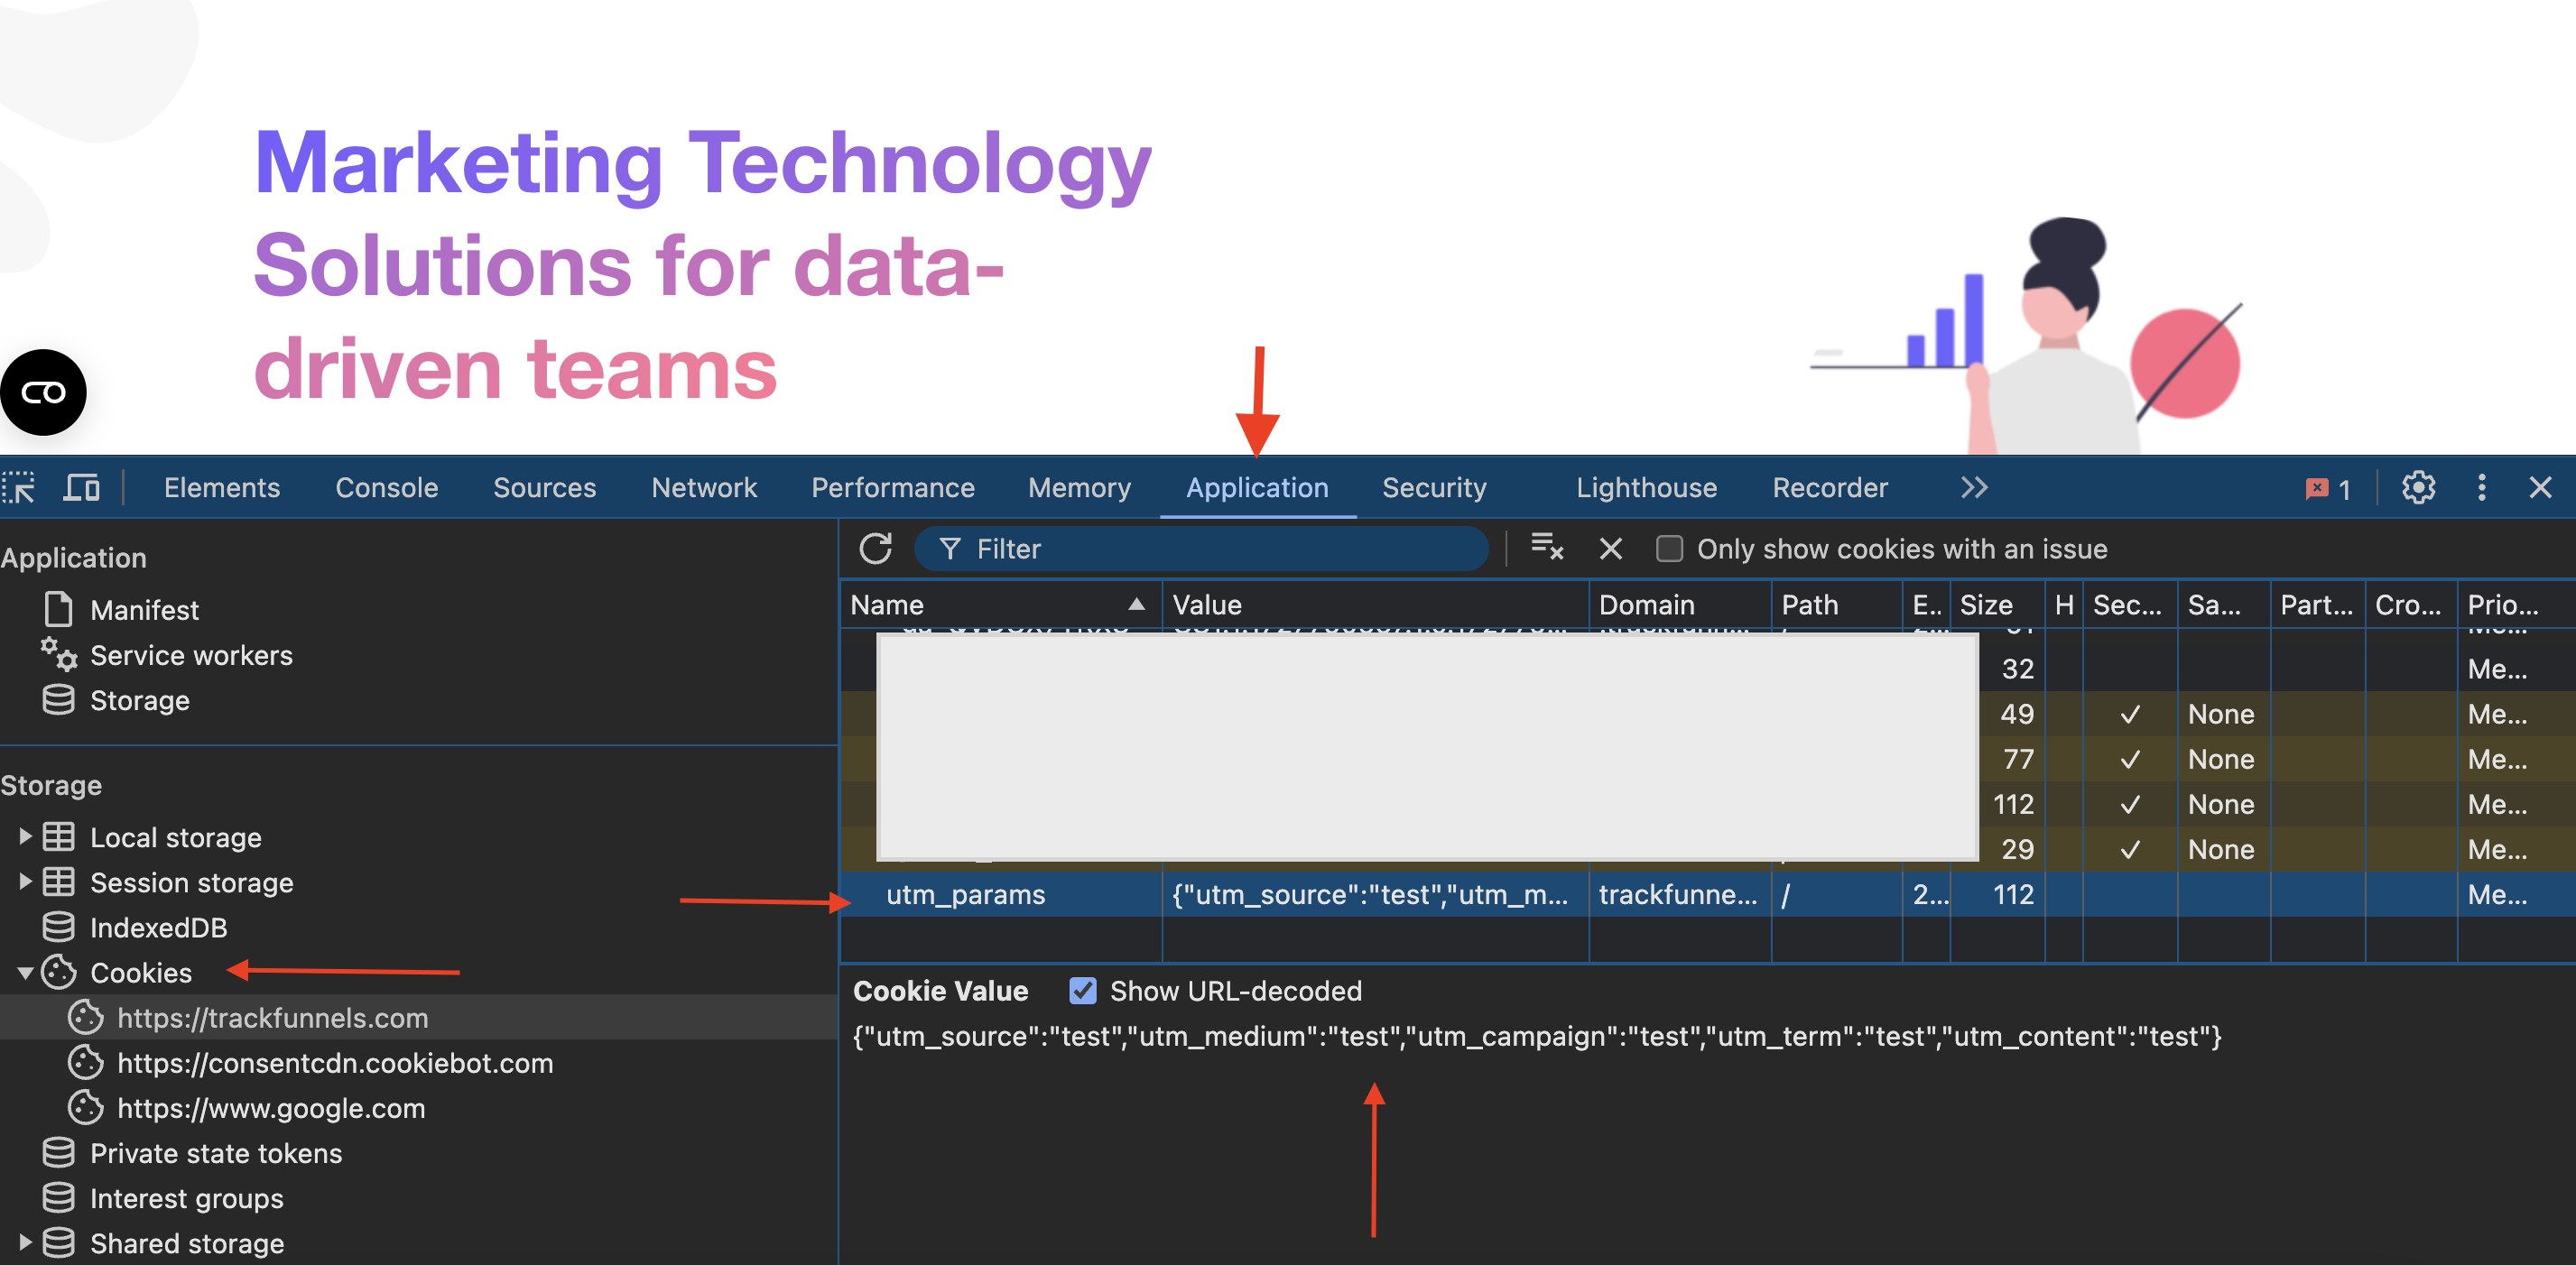
Once you start to successfully store UTM information in cookies, you should see this cookie in the Application Tab of your Chrome Developer Tools as shown below

Step 2: Auto-set UTM parameters in Calendly Embed

Once you are sure that the UTM parameters are stored in the cookies, you can go ahead and start setting your embed code as shown below:

There are 3 parts to Advanced Embed code unlike the General Embed that has 2.

Part 1: The HTML

This is just an empty <div> but with a specific CSS ID.

Looks like this

<div id="calendly-embed" class="calendly-embed" style="min-width:320px;height:700px;"></div>

Part 2: The Calendly JS that loads from Calendly server.

Looks like this

<script type="text/javascript" src="https://assets.calendly.com/assets/external/widget.js"></script>

Part 3: The Calendly Widget Script that loads your calendar and has options for UTMs

Looks something like this (depending on options you have selected)

<script>
  Calendly.initInlineWidget({
    url: 'https://calendly.com/YOURLINK',
    parentElement: document.getElementById('SAMPLEdivID'),
    prefill: {},
    utm: {}
});
</script>

We are going to make some changes to all three parts of your embed code. The biggest change will be in Part 3.

Moreover, we’ll also rearrange the order of the 3 parts a bit.

Instead of following the same order as given by Calendly, we’ll swap positions between Part 2 and Part 3.

So the external javascript shall be at the bottom of the embed code instead of in the middle

For Curious Minds  – Why did we change the order?


What Calendly pages don’t tell you (they expect the developers to know this) is that the external javascript should load before the Calendly function executes because the function utilizes resources from this Javascript. If your Calendly function executes before the external Javascript, your Calendar will not load and you’ll see an error in the console as shown below

What we do is this – we “define” the Calendly function first and only then load the external javascript. As soon as the external javascript is loaded, we execute the function we have already defined. It’s just pure simple logic.

We “define” this calendar loading function as loadCalendlyWidget() but you can name it anything you want as long as you understand the logic. If you do change this name, pay attention to the external Javascript call because you’ll have to update it there.

Here is how the external Javascript would look like

<script type="text/javascript" src="https://assets.calendly.com/assets/external/widget.js" onload="loadCalendlyWidget()"></script>

See the red part? That’s what we have changed from the default embed code. Now at this point, your code would like this

<!-- part 1: div containing the calendar ->

<div id="calendly-embed" style="min-width:320px;height:700px;"></div>

<!-- part 2: function definition that loads the calendar  ->

<script>
function loadCalendlyWidget () {
    Calendly.initInlineWidget({
        url: 'https://calendly.com/YOURLINK',
        parentElement: document.getElementById('calendly-embed')
    });
}
</script>

<!-- part 3: external javascript with reference to above function  ->
<script type="text/javascript" src="https://assets.calendly.com/assets/external/widget.js" onload="loadCalendlyWidget()"></script>

However, the current code doesn’t yet account for UTM parameters. Since we’ve already stored the UTM parameters in cookies, the next step is to extract them and pass them into our embed code. This is the update we’ll make in Part 2 of the code.

If you’re not interested in a detailed explanation of how this works, feel free to skip ahead and copy the full script. Otherwise, stick with me as we walk through the process and understand why this approach works.

First, we define a function to read the cookie. As mentioned in our article on “how to store UTM parameters in cookies,” we use a cookie named utm_params to store all the UTM parameters as key-value pairs. When the cookie contains all the necessary parameters, it will look something like this:

{"utm_source":"test","utm_medium":"test","utm_campaign":"test","utm_term":"test","utm_content":"test"}

If you have changes any of that implementation whether the name of the cookies or how you are storing them, you’ll have to accordingly update the code otherwise you can just follow along

Function to read the cookie

function getCookie(name) {
  const value = `; ${document.cookie}`;
  const parts = value.split(`; ${name}=`);
  if (parts.length === 2) return parts.pop().split(';').shift();
  return null;
}

Function to create Mapping of values found in the cookie with Parameters accepted by Calendly code.

Note this is required because Calendly is expecting the keys for UTM parameters as:
utmCampaign, utmSource, utmMedium, utmContent, and utmTerm
rather than the expected
utm_source, utm_medium, utm_campaign, utm_content and utm_term
(Don’t worry about the order in which they are placed – it doesn’t matter.)

function mapUtmParamsToCalendly(utmParams) {

  // Map the UTM parameters from the cookie to Calendly's expected format
  return {
    utmCampaign: utmParams.utm_campaign || "",
    utmSource: utmParams.utm_source || "",
    utmMedium: utmParams.utm_medium || "",
    utmContent: utmParams.utm_content || "",
    utmTerm: utmParams.utm_term || ""
  };
}

Now we include both these functions inside our loadCalendlyWidget function (changes are highlighted in red with notes)

function loadCalendlyWidget() {

  // Get UTM parameters from the 'utm_params' cookie
  const cookieUtmParams = getCookie('utm_params');
  let utmParams = {};

  if (cookieUtmParams) {
    try {
      // Parse the UTM parameters stored in the cookie
      utmParams = JSON.parse(cookieUtmParams);
    } catch (e) {
      console.error("Error parsing UTM parameters from cookie:", e);
    }
  }

  // Map the UTM parameters to the format expected by Calendly
  const mappedUtmParams = mapUtmParamsToCalendly(utmParams);

  // Initialize Calendly with UTM parameters from the cookie
  Calendly.initInlineWidget({
    url: 'https://calendly.com/YOURLINK',
    parentElement: document.getElementById('calendly-embed'),
    utm: mappedUtmParams // Pass mapped UTM parameters here
  });
}

This looks like quite a bit of changes but don’t worry, it’s worth it. When you consistently start getting the UTM parameters for all your appointments, you won’t regret this.

Full Script

Here is the full script that you can use.

This script will work as-is if you have used the same naming of functions and cookies as we described in our articles.

You HAVE to update a couple of parts in this code – DO NOT FORGET! Because this will be different for you. Highlighted in Blue.

<!-- Calendly inline widget begin -->
<div id="calendly-embed" class="calendly-embed" style="min-width:320px;height:700px;"></div>

<script>
function getCookie(name) {
  const value = `; ${document.cookie}`;
  const parts = value.split(`; ${name}=`);
  if (parts.length === 2) return parts.pop().split(';').shift();
  return null;
}

function mapUtmParamsToCalendly(utmParams) {
  // Map the UTM parameters from the cookie to Calendly's expected format
  return {
    utmCampaign: utmParams.utm_campaign || "",
    utmSource: utmParams.utm_source || "",
    utmMedium: utmParams.utm_medium || "",
    utmContent: utmParams.utm_content || "",
    utmTerm: utmParams.utm_term || ""
  };
}

function loadCalendlyWidget() {
  // Get UTM parameters from the 'utm_params' cookie
  const cookieUtmParams = getCookie('utm_params');
  let utmParams = {};
  if (cookieUtmParams) {
    try {
      // Parse the UTM parameters stored in the cookie
      utmParams = JSON.parse(cookieUtmParams);
    } catch (e) {
      console.error("Error parsing UTM parameters from cookie:", e);
    }
  }

  // Map the UTM parameters to the format expected by Calendly
  const mappedUtmParams = mapUtmParamsToCalendly(utmParams);

  // Initialize Calendly with UTM parameters from the cookie
  Calendly.initInlineWidget({
    url: 'https://calendly.com/YOURLINK',
    parentElement: document.getElementById('calendly-embed'),
    prefill: {},
    utm: mappedUtmParams // Pass mapped UTM parameters here
  });
}
</script>

<script type="text/javascript" src="https://assets.calendly.com/assets/external/widget.js" onload="loadCalendlyWidget()"></script>
<!-- Calendly inline widget end -->

Be sure to thoroughly test the implementation several times before rolling it out on your live site.

One important point to keep in mind is that this solution focuses on providing Last Click Attribution with UTM parameters, ensuring that bookings can be tied back to your promotions—even if the appointment was ultimately booked during a subsequent “direct” visit. The goal is to minimize the reliance on “direct” attribution, which often obscures the true source of your leads.

Don’t forget to remove any console log statements from your code when you’re ready to deploy it.

If you run into any issues or need further assistance, feel free to leave a comment below, and we’ll be happy to help!

Analyzing Calendly Attributions

With TrackFunnels Pro Account, you can integrate TrackFunnels with Calendly and get your reports right where you build your UTM links informing you exactly which UTMs are working for you. Start by getting a free account →

0 Comments

    Leave a Reply